Scenario
So you’ve finished CCNP by scoring 900+ on all three exams and you feel pretty confident about starting your CCIE journey. In studying for the written exam, you also like to build complex labs in your spare time. You haven’t quite learned all of the CCIE technologies yet, but you’ve seen enough tricks from other practice labs that you decided to build your own! See if you can solve this lab in 8 hours or less while concurrently minimizing the use of “show run” and “show start”.
Goal:
- Nothing has been preconfigured for you! You must build this lab completely from scratch, so pay close attention to the cabling instructions.
- No static routing, policy-based routing, or default routing is allowed unless explicity stated.
- Each router should be configured with two loopbacks. “x” is the router number. For example, R1 would have 1.1.1.1/32 and 11.11.11.11/32, R2 would have 2.2.2.2/32 and 22.22.22.22/32, etc.
Loopback0 = x.x.x.x /32
Loopback1 = xx.xx.xx.xx /32 - Switch cabling:
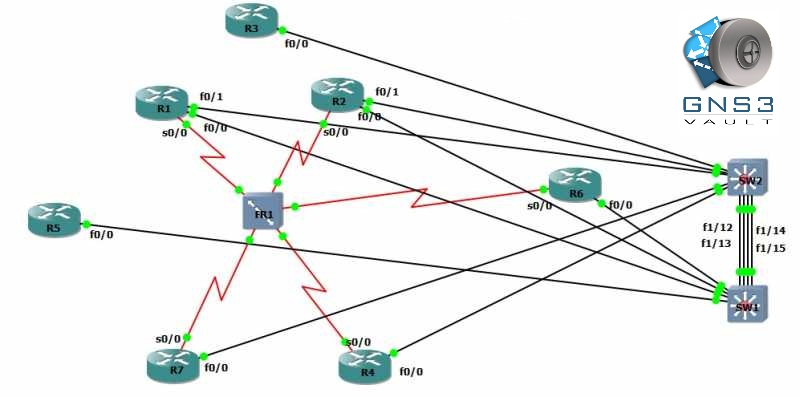
R1 F0/0 -> SW1 F1/1, VLAN 123
R1 F0/1 -> SW2 F1/1, VLAN 137
R2 F0/0 -> SW1 F1/2, VLAN 123
R2 F0/1 -> SW2 F1/2, VLAN 246
R3 F0/0 -> SW2 F1/3, VLAN 123
R4 F0/0 -> SW2 F1/4, VLAN 246
R5 F0/0 -> SW1 F1/5, VLAN 157
R6 F0/0 -> SW1 F1/6, VLAN 256
R7 F0/0 -> SW2 F1/7, VLAN 157 - Frame Relay DLCI mapping
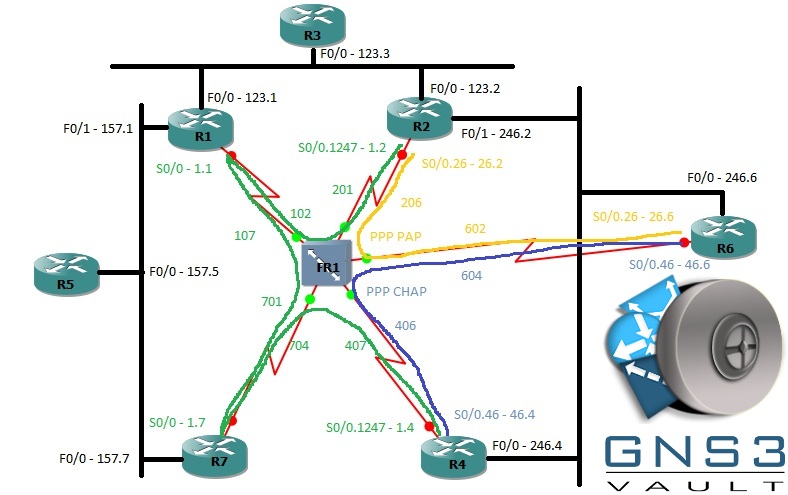
R1:R2 :: 102:201
R1:R7 :: 107:701
R7:R4 :: 704:407
R4:R6 :: 406:604
R6:R2 :: 602:206 - Phase 1: Basic configuration
1. Build the topology as shown in the diagram by making physical connections.
2. Configure all IP addresses and the FR switch as described above and shown in the diagram.
3. Disable automatic speed and duplex negotiation on all FastEthernet interfaces. Use the fastest line speed and duplex settings you can.
4. Disable CEF on all routers. Disable ip route-cache and ip mroute-cache on all multicast-routing interfaces. This is to overcome a multicast bug with GNS3. - Phase 2: Frame Relay
1. On R1, R2, R4, and R7, configure frame relay. Use a non-proprietary encapsulation form, do not rely on IARP, and do not use the word “broadcast” anywhere in your configuration. Pay attention to the IP subnets; they will tell you whether to use P2P or MP links. Ensure you can communicate from R2 to R4. Helper commands: show frame-relay map, show frame-relay pvc
2. On R4 and R6, configure PPP over frame relay. Use CHAP for additional security. Helper commands: debug ppp negotiation, debug ppp authentication
3. On R2 and R6, configure PPP over frame relay. Use PAP for additional security. Helper commands: debug ppp negotiation, debug ppp authentication - Phase 3: LAN Switching
1. Add VLANs 123, 157, and 246 to the VLAN database and configure the VLAN-port mapping as described above. In GNS3, you have to do this EVERY TIME you reopen your project! Also, ensure your switches are Layer 2 only; by default in GNS3 they are multi-layer.
2. Configure SW1 as the root bridge for VLANs 1 and 123. Configure SW2 as the root bridge for VLANs 157 and 246. Helper commands: show spanning-tree root port, show spanning-tree root cost
3. Bundle F1/12-13 into PortChannel1 and F1/14-15 into PortChannel2 on both switches. Enable static Etherchannel. Helper commands: show etherchannel summary
4. Configure F1/12-15 and Po1-2 as 802.1Q encapsulated trunks.
5. To make best use of your new Etherchannels, you decide to load balance VLAN traffic across your two trunks. Po1 should carry VLANs 1 and 123 and Po2 should carry VLANs 157 and 246. If one trunk fails, the other must take over (that is, do NOT use “switchport trunk allowed vlan” command). You are only allowed to configure SW1 Po1 interface to achieve this. You can use “show” commands on SW2. Because there are only two switches, the roots will always have their ports in a forwarding state for the VLANs for which they are the root of the spanning tree; don’t worry about this. Helper commands: show spanning-tree, show interfaces trunk
6. A data collector wants to look at the traffic coming from and going to R1 and R2 on VLAN 123. Configure SPAN on SW1. The data collector will plug into F1/0 on SW1.
7. Test connectivity between the router FastEthernet interfaces on the same segment. Helper commands: show arp (router), show mac-address-table (switch) - Phase 4: OSPF
1. Configure OSPF area 0 on R3 loopback0 interface. Make sure LSAs are not sent to this loopback.
2. Configure OSPF area 123 on R1, R2, and R3 F0/0 interfaces (corresponding to VLAN 123). Ensure R3 is the DR and R1 is the BDR on the segment. Helper commands: show ip ospf neighbor, show ip ospf interface
3. Configure OSPF area 17 between R1 F0/1 and R7 F0/0 interfaces. To ensure R5 does not see any OSPF hello messages, send the updates as unicast packets. Ensure R7 is the DR on the segment with R1 and the BDR.
4. Configure OSPF area 127 on R1, R7, and R2 frame-relay interfaces (whatever you called them). There should be no DR election on this network. Remember, this segment of the FR network is NBMA!
5. Configure OSPF area 246 between R2, R4, and R6 frame-relay interfaces but NOT their FastEthernet interfaces on the LAN segment. To be clear, R2 and R6 will neighbor, and R4 and R6 will neighbor, as there is no DLCI between R2 and R4.
6. Ensure all OSPF routers have full connectivity to the backbone area.
7. Go back and add MD5 authentication to every OSPF link, including the secret ones I did not explicitly tell you to configure. - Phase 5: EIGRP
1. Configure EIGRP AS 2467 between R4 and R7 FR interfaces (NBMA again).
2. Configure EIGRP on R2 F0/1, R6 F0/0, and R4 F0/0 interfaces on VLAN 246. Helper commands: show ip eigrp neighbor
3. Advertise R2, R4, R6, and R7 loopback0 interfaces into EIGRP, and make sure they do not participate in forming neighborships. Helper commands: show ip eigrp interface
4. From R2, ensure you can ping to 7.7.7.7 from 2.2.2.2.
5. *This is not EIGRP related, but critical for the next task* Configure NTP on R2, R4, R6, and R7. NTP updates should be sourced from loopbacks in all cases and should be authenticated with MD5. R4 is the NTP master and the other routers are simply peers. Ensure NTP is functional with an accurate clock before continuing. Helper commands: show ntp status
6. Go back and add MD5 authentication to every EIGRP link. Use a rotating key. The first key is good from the time you started this lab until 1 hour from now. The second key is valid beginning 55 minutes from now and is good forever. This way, in one hour, you will be able to see if you configured this task properly. Helper commands: show ip eigrp interface detail, show key chain
7. R4 and R6 are not allowed to accept updates from one another, but still want to maintain their neighborship. Therefore, you cannot use the neighbor command. Ensure R4 and R6 ignore all updates from one another, but continue to listen to R2. Ensure there is no loss of connectivity or suboptimal routing. Hint: You will have to configure all three routers.
8. Add (4) loopbacks to R2 with IP addresses 172.16.0.1/24, 172.16.1.1/24, 172.16.2.1/24, and 172.16.3.1/24. Summarize these on the F0/1 interface, but make sure the 172.16.2.0/24 is still advertised explicitly. Also, this 172.16.2.0/24 route should be set to tag 2 when it is advertised out of F0/1. - Phase 6: GLBP
1. R5 is only a part-time router. Sometimes it wants to act like a host. Configure a static default route on R5 pointing to 192.168.157.254.
2. Configure GLBP 157 on R1 F0/1 and R7 F0/0. The virtual gateway is 192.168.157.254. Ensure R5 can ping this virtual gateway. Helper commands: show arp
3. R1 should be the AVG initially. Both routers should pay a penalty with respect to their priorities if their serial (FR) interfaces lose line protocol. For example, if R1 is AVG and it’s S0/0 goes down, R7 becomes AVG. If R7 S0/0 goes down next, R1 regains AVG role. R5 should be able to reach any OSPF router at this point given that it’s traffic is sourced from F0/0. Helper commands: show glbp, show track - Phase 7: Redistribution
1. Configure a static route to 5.5.5.5/32 on both R1 and R7 with a next hop of R5 F0/0 interface. Selectively redistribute these routes at both R1 and R7 into OSPF (this means use a route-map). You are not allowed to use ACLs or prefix-lists anywhere in this solution. Ensure other OSPF routers can reach this network. Helper commands: show route-map, show ip protocols, show ip ospf database external
2. Mutually redistribute between EIGRP 2467 and OSPF on R2, R6, R4, and R7. Ensure no loops or suboptimal routing occurs. You will need to use route-maps in some places to perform filtering. Helper commands: show ip protocols, debug ip routing, show ip route eigrp, show ip route ospf - Phase 8: BGP
1. Configre BGP AS 135 between R1, R3, and R5. You can only peer R5-R1 and R5-R3 and cannot use confederations. R5 and R3 should source updates from loopback0, while R1 should source updates from F0/1. Helper commands: show ip bgp summary, show ip bgp neighbors, debug ip bgp
3. Configure BGP Confederation-AS between R4 F0/0 (Sub-AS 4) and R6 F0/0 (Sub-AS 67). Also peer from R6 Loop0 to R7 Loop0 (also in Sub-AS67).
3. Configure BGP AS 2 on R2. R2 F0/0 peers with R3 Loop0 and R2 F0/1 peers with R4 Loop0.
4. Configure BGP between R5 Loop0 and R7 Loop0.
5. Each router must bring it’ Loopback 1 interface into BGP.
6. Ensure you have full IP connectivity between Loopback1 interfaces. You will need to manipulate BGP path attributes to make this work, as it will be broken in the default configuration.
7. R4 used to be in AS 4444 before joining the confederation. R2 still wants to peer with R4 using that AS. Without changing the actual BGP AS numbers, re-configure the R2-R4 peering so that R2 is configured with “neighbor 4.4.4.4 remote 4444”.
8. Add two new loopbacks onto R6 with IP addresses 66.66.66.1/32 and 66.66.66.2/32. The first loopback should not be allowed outside of the Sub-AS 67 (only R7 sees it), while the second should not be allowed out of the confederation AS 467 (R7 and R4 see it). Do not use the “network” command for this task, do not bring any other networks into BGP other than the two stated in this task, and make sure the origin for these routes is IGP.
9. Go back and enable MD5 authentication between all true eBGP links (not within the confederation). iBGP links will remain unsecure. - Phase 9: Misc features
1. Configure R1 so that it only accepts telnet connections from R6 Loopback1.
2. Configure R7 so that it only accepts SSH connections from R3 Loopback1.
3. Copy R5’s running configuration into flash memory just in case.
4. Copy R6’s EIGRP topology table into flash memory too. Be sure to include nonsuccessor routes as well.
5. On R6, print the contents of Task #4 onto the screen by reading from flash, not issuing the IOS command “show ip eigrp …”
6. Using IP SLA on R5, send a ping from R5 Loop1 to R3 Loop1 every 5 seconds, beginning now, running forever. The pings should be successful. - Phase 10: QoS
1. R1 and R7 both agree that traffic from R5’s Loopback0 is not important. Ensure it receives the lowest possible DSCP value before going out over FR. If the traffic doesn’t go over FR, it can retain it’s DSCP value. Additionally, ensure the FR network makes this traffic from this source more likely to be discarded if the network becomes congested.
2. R1 and R7 also agree that traffic from R5’s Loopback1 is very important, as long as it isn’t ICMP. For all non-ICMP traffic, apply a high DSCP value with a medium drop probabiltiy that is not EF. For ICMP traffic, apply a low DSCP value with a high drop probability that is not zero. RTP audio treatment should get expedited service through the network, however, and should also be guaranteed 15% of the bandwidth over the frame relay network. Non-ICMP traffic should be granted 25% of what
bandwidth remains.
3. R1 and R7 also expect to see a lot of non-ICMP, non-RTP traffic from traffic from R5’s Loopback1 interface. You fear that the queues may fill to capacity and suffer tail drop. Enable a feature to mitigate this so that after 20 packets are in the queue, 1 in every 15 packets gets dropped. After 45 packets are in the queue, all packets will be dropped. Helper commands: show ip nbar …. , show policy-map interface - Phase 11: Multicast
1. Establish a GRE tunnel between R1 F0/0 and R4 F0/0 interfaces. Enable OSPF over this tunnel without making any configurations under “router ospf”. Be sure to authenticate OSPF updates. Use any IP address for the tunnel interface, and any OSPF area ID.
2. Enable PIM-SM on the tunnel. R4 Loopback0 should be the RP for group 225.3.3.3 and no other groups.
3. R3 F0/0 wants to receive multicast on group 225.3.3.3.
4. R6 is the source for this multicast traffic. Ensure R6 can send multicast to 225.3.3.3 successfully.
5. For additional security, configure IPSEC over GRE on the tunnel between R1 and R4 and ensure the multicast traffic goes over this tunnel. Use AES 256 for encryption, SHA-1 for authentication, and DH Group 2. Helper commands: debug crypto ipsec, debug crypto isakmp, debug crypto engine, show crypto isakmp peer, show crypto ipsec sa
IOS:
c3725-adventerprisek9-mz.124-7.image
Topology:
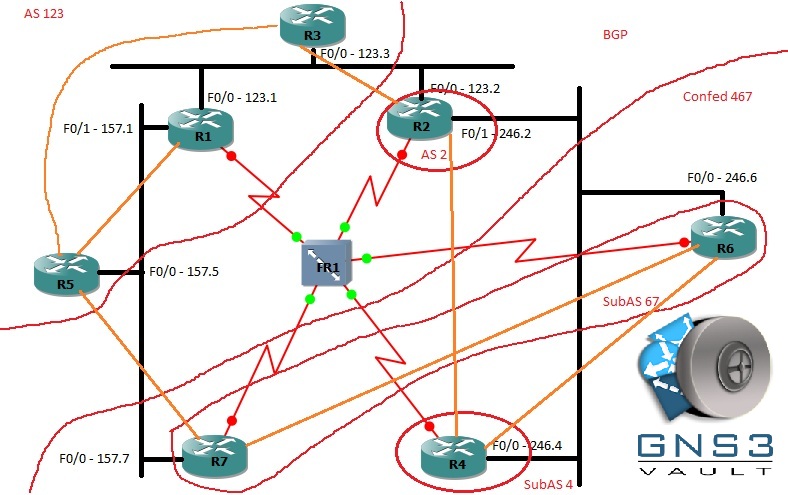
Basic GNS3 physical topology
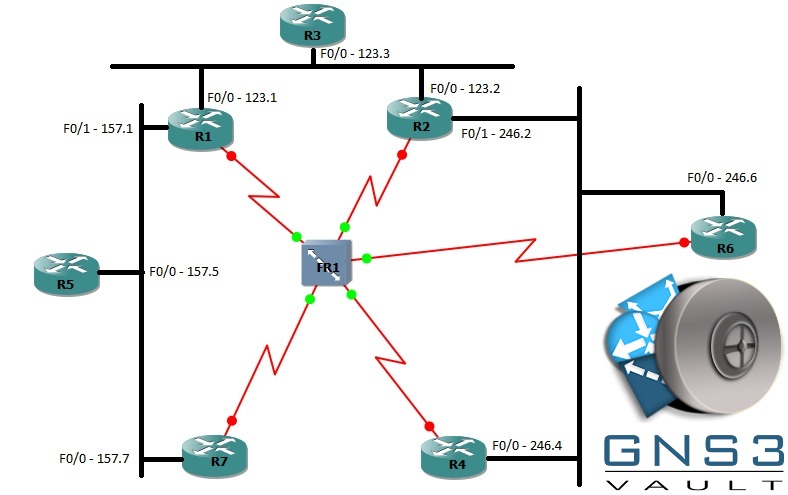
Basic GNS3 Topology, Logical diagram with switches removed
Frame Relay topology
IGP Topology
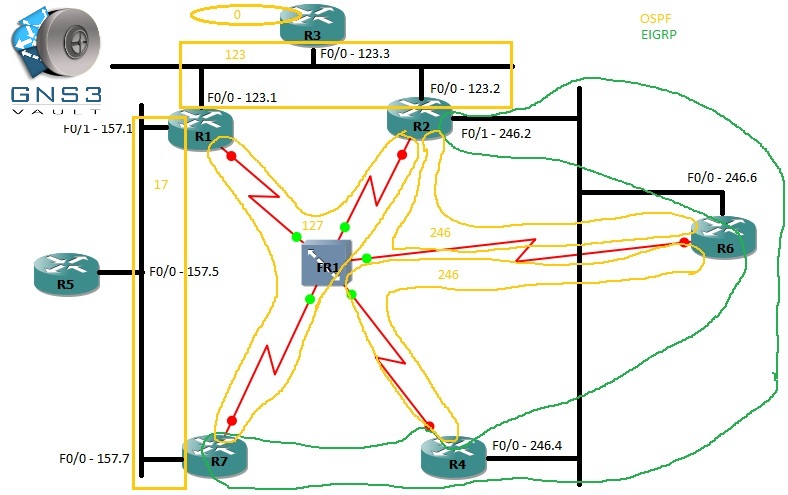
EGP Topology
You need to register to download the GNS3 topology file. (Registration is free!)
Once you are logged in you will find the configuration files right here.
The How to Master series helps you to understand complex topics like spanning-tree, VLANs, trunks, OSPF, EIGRP, BGP and more.
Written by René Molenaar - CCIE #41726


are there any answers?
Mistype on the Sw2 F1/1 vlan. It should be 157
PLs..some video and final configs it really helps a lot..:)
where is the gns .net file for this lab for download,i can see the topolgy images of it
Greetings,
Just to let everyone know. no answers will be provided. This is a CCIE lab, You are suppose to figure it out yourself. There is no configuration file. He states nothing has been configured for you. So you have to lab it up yourself.
CCIE is the next level. Looking for the answers will not help you here.
PS, I do not work for the website. This is just my opinion.
Spencer is correct. Truth me told, it would take days to make a solution video, and none of us have quite the time for that. Look over the final configs and use that as a guideline. I wrote this lab almost 2 years ago, before I was a CCIE, so I cannot guarantee it is 100% correct.
Where can one obtain the final configs? I cannot find them anywhere since the website was updated.
Thanks
Is this lab up to date to practice for the real exam?? And where can one get the final config to use as a guideline. Not looking for the answer just the guide.. This is a good resource I must say..
Rene may have the final config, some things got mixed up during the website move. The lab is mostly up to date with the v4 blueprint. With the new CCIE v5 blueprint in its infancy, however, this lab is about 80% up to date now.
Problem with the logical diagrams,the basic gns 3 topology shows 2 multi-layer switches,but the other diagrams show 3 switches.
Ignore that,after another look i understood the diagrams.
Where are the three switches in the other diagrams? Those are LAN segments, expressed as VLANs, and there is not a physical switch in between each set of routers.
Moving this lab to v5 is not that difficult. Replace the Frame Relay concepts with a DMVPN cloud.
Thanks for the lab.
Yes, I see this as a common strategy among migrating v4 to v5 labs. Just understanding that the two are different in ways to where it doesn’t always make sense to just convert all FR to DMVPN, and since the underlying L2 transport is Ethernet everywhere in this case, it isn’t challenging to have all your routers having direct NBMA reachability to eachother. That is just way too easy for the CCIE lab. What would make more sense is to take the FR topology and introduce something like PVLANs to create L2 segmentation, then run DMVPN long-range across the network so that NBMA reachabiltiy was a function of process-learned routing, not just connected routing and ARPs. In real life, if you had direct L2 reachability between all your DMVPN sites, it probably doesn’t make sense to tunnel in the first place, unless you needed encryption, in which case a crypto map on a physical interface might be a good option. Hope that make sense.
Hi Nicholas and Rene,
I want to start preparing for my CCIE, which books are recommended for the preparation of this exam? and Tips would be highly appreciated.
Regrads.
Hi Rene,
Where is the GNS3 file? Thanks.
Regards,
Karim