Scenario:
Being a full-time Cisco Network Engineer you decide to implement a new router at your home network. You heard good stories about Zone Based Firewalls so you decide to beef up your home security. Let’s see what you can do…
Goal:
-
All IP addresses have been configured for you, every router has a loopback interface:
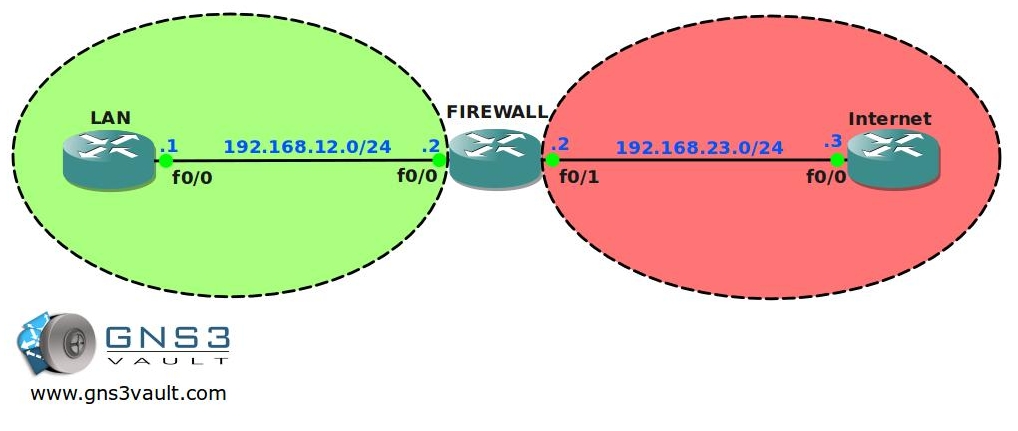
Router LAN: L0: 1.1.1.1 /24
Router FIREWALL:L0: 2.2.2.2 /24
Router INTERNET: L0: 3.3.3.3 /24 and L1: 33.33.33.33 /24 - Static routes have been configured for you, there is full connectivity between the routers.
- Router INTERNET has the following services configured: SSH, TELNET, DNS, HTTP and HTTPS.
- Router FIREWALL has the following services configured: SSH and TELNET.
- Username: gns3vault
- Password: gns3vault
- Create 2 security zones called “LAN” and “INTERNET” on router FIREWALL.
- Place the corresponding interfaces into the correct zones.
- Create the correct class-map, policy-map and zone-pair so traffic from LAN to INTERNET is allowed, including the return traffic.
- Traffic from INTERNET to LAN should be blocked.
- Increase security by only allowing HTTP, ICMP and HTTPS traffic from LAN to INTERNET.
- Test this by using telnet from router LAN to router INTERNET, this should be blocked.
The security between your LAN and the INTERNET is looking good, but users from the LAN are still able to telnet or ssh into your Firewall. Even worse, people from the Internet can telnet or ssh into your firewall as well! Time to protect your firewall…
- Connections from the INTERNET should only be able to ping to router FIREWALL. Use “Zone Self” to achieve this.
- Users from the LAN should only be able to SSH into router FIREWALL, Telnet should be blocked. Use “Zone Self” to achieve this.
IOS:
c3725-adventerprisek9-mz.124-15.T7.bin
Topology:
Video Solution:
Configuration Files
You need to register to download the GNS3 topology file. (Registration is free!)Once you are logged in you will find the configuration files right here.
The How to Master series helps you to understand complex topics like spanning-tree, VLANs, trunks, OSPF, EIGRP, BGP and more.
Written by René Molenaar - CCIE #41726

It would be a great experience to work on this.
Gr8 excersize.need more of these 😉
Thanks!
this is great! thank you very much….
Thanks!
Very nicely done.Hope you put out some more of this with different scenario. Great job Rene.
I’ll do my best 🙂
Thank You Very Basic,but very Informative!!!
Thanks for the LAB, it worked perfectly as the video tutorial!
Great Lab, thank you Rene!
I have one further question, I have added SSH access from Internet to Firewall, at first I got the following error message:
%Protocol ssh configured in class-map Internet_to_Self_Class cannot be configured for the self zone. Please remove the protocol and retry
After changing the policy-map from "inspect" to "pass" I was able to add SSH access to the class-map.
Is this just an issue in GNS3 or do I have to use "pass" on real world gear as well? How about GRE and ISAKMP, use "pass" as well?
In this case you don’t need zone-based. Just enter the line vty 0 4 and type transport has preferred ssh.
Very simple!
where can I get the image for this lab
Hi Rene
Are this is different with DMZ?
Are you have lab vidoe for DMZ?
Thanks
how to block social networks like facebook ??
Rene … you are doing awesome work….. How much you are helping people ..is somewhat beyond imagination…. We hardly learn anything without practice..Tons of Thanks from core of my heart..:D:)
How can we login to routers ??
Rene,
Great tutorial. I did this using CCP for my study for the CCNA Security exam.
Thank you,
Doug
The link for the final configs is the same as the start link download.